Journey to Redux-land
Last updated: 2024-01-12 (2 years ago)Wise words just before we startAdding Redux to your project comes with a number of concepts and jargon that are important to grasp, so we shall provide a first definition right now, to clear up our ideas before we see each of these terms in action in a little while:
- Redux, by itself, is a Javascript library for creating and managing a state container within a web application;
- Redux Toolkit is the official toolbox for developing with Redux, it comes equipped with functions to simplify implementation, facilitate best practices, and prevent common mistakes;
- React-Redux is also an official package that provides tools to easily connect a Redux state with a React application;
- Redux holds the state of an application into a container called a store;
- The only pieces of code allowed to update the state are called reducers, which can be called from our components;
- To trigger a reducer into modifying the state, the only allowed way is by dispatching an action. More on that later.
Understanding Redux and the role it's meant to fulfill
- We can have a single source of truth sharing data across the whole application, without worrying about synchronisation since all components consume the same state. Usually that rhymes with fewer requests to the database, and especially fewer duplicate requests, which is already a great performance boost;
- Debugging also becomes much easier, particularly thanks to the Redux dev tool extension, which allows developers to visualise the store's data at any point in time, but also every action dispatched to update the store. It's dificult to overstate how useful that extension is when debugging your code;
- Redux toolkit ships with helper functions that will greatly reduce the hassle of following Redux best practices;
- Redux is not meant to be a silver bullet solution, you can use it alongside regular React state management. It's also possible to incrementally integrate it to an already mature project.
Now this is all awesome news, but hold your horses! Using Redux also comes with a tradeoff in complexity and code written, which is why you should consider if your application needs Redux in the first place. A couple of comments to help you decide:
- You should use Redux on medium to large applications, where state management is complex and 'lifting state up' is increasingly cumbersome;
- The Redux store and React state are NOT mutually exclusive, you can perfectly well mix both, and you should. State that is the concern of only one local component should not be brought over to the store, but kept close to the component in a useState hook for example. Reserve the use of the store when the data will be shared by a number of components all over your application;
- As mentioned, adding redux will require writing more code, and adds a layer of complexity. Make sure you are familiar with Redux fundamentals first. The good news is that some of that complexity is taken care of by Redux toolkit.
So let's assume you've come to the conclusion that Redux would indeed, be a great addition to your project, and let us take a look at the workflow of a Redux-powered app. Since it is a ripe time to rely on a visual aid, we will leverage this effective gif found on Redux's official website:
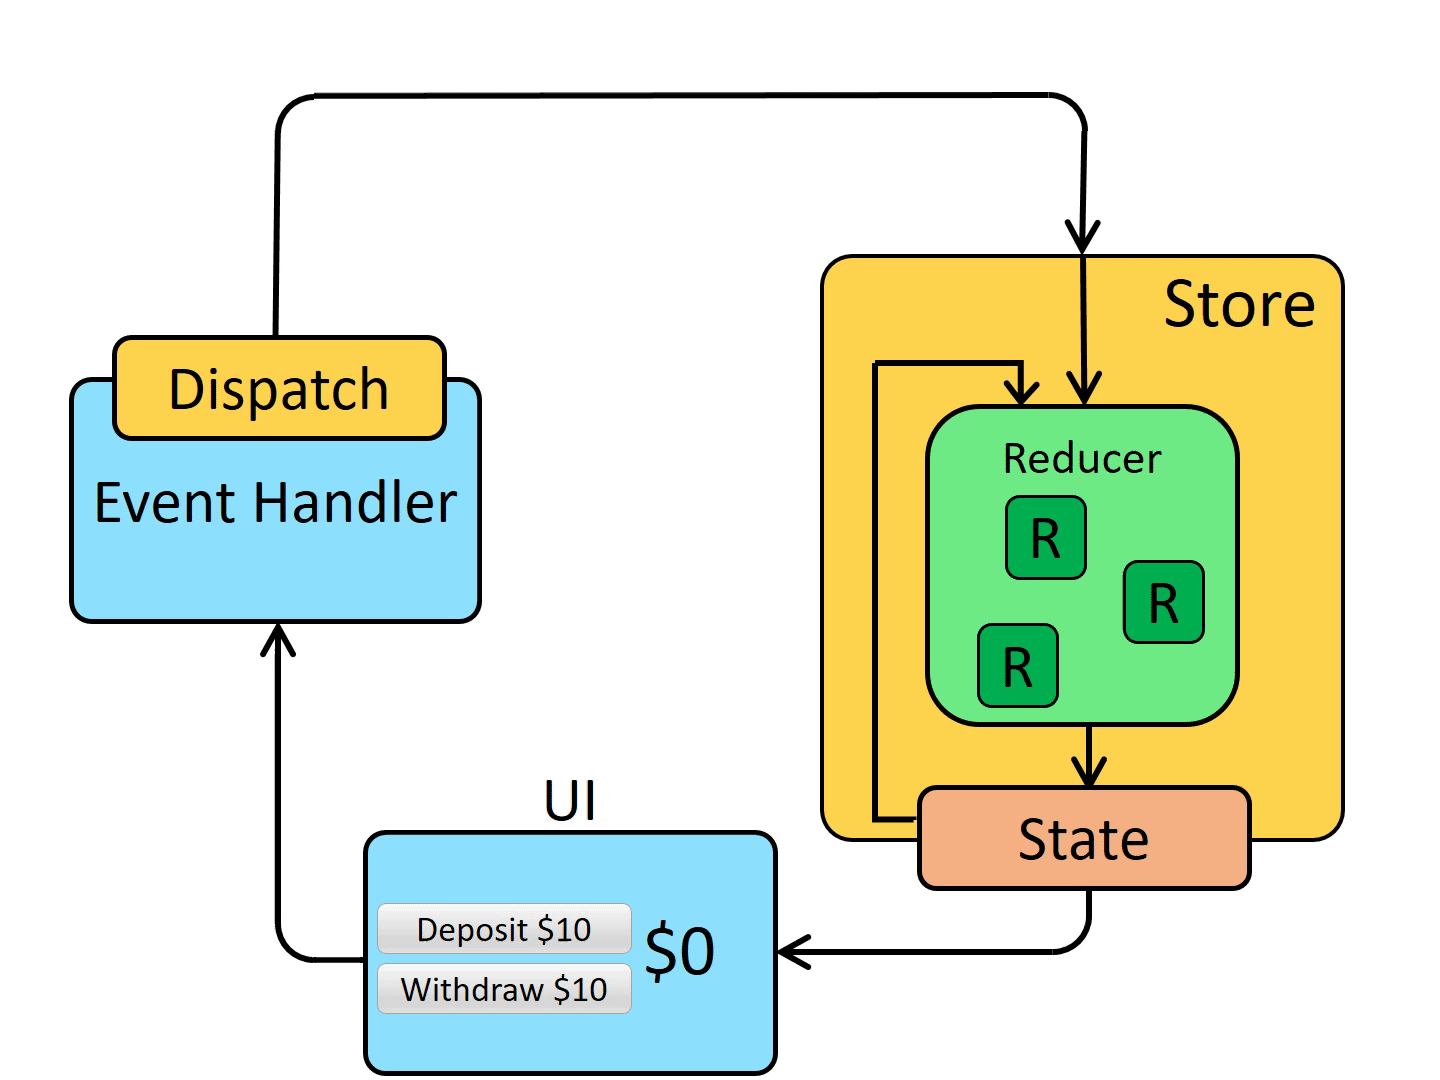 Redux workflow - full loop
- We'll start from the UI, which provides a button to deposit 10$ into a pretend bank account, and a button to withdraw 10$. Clicking on the 'deposit' button will trigger its event handler, which is very standard code so far;
- Things get interesting within the event handler though, which calls a 'dispatch' function, the first step to updating the Redux state;
- Dispatchers are meant to dispatch one thing and one thing only, an 'action'. That action is comprised of a type, which describes what kind of change we want to perform on the store, and an eventual payload, holding data needed to carry out that change;
- When an action arrives at the store, it is immediately greeted by one of many 'reducer' functions, responsible for safely updating the store. Reducers expect two parameters, the current Redux state, and the action;
- Given the current state and the action, the reducer is able to compute the new state, and finally commits that change to the actual store. One essential aspect of reducers is that they should always work on a copy of the state, and never update it directly. This principle is called the immutability of the state, and is required for Redux to work properly.
Level 1 - Basic integration to a React app
With a shocking lack of originality, the first stop is to install Redux toolkit and React-Redux libraries:
npm install @reduxjs/toolkit react-reduxStar Wars Game Shop - v1
Catalogue - Create and arrange sets of collectibles by clicking on an item to include to the collection.Click on a character to add it to the current set
Luke Skywalker
Leia Organa
Chewbacca
Workshop - Load up a set to rename it, or click on an item to remove it from the collection.
Create a set
- It loads up 3 hard-coded character collectibles, showed in the 'Characters' tab. Clicking on one of them will add it to the current set, only if a set has been selected of course. It is not possible to add an item twice to the same set;
- 'Planets' and 'Starships' related collectibles are not supported yet;
- The 'Collectible sets' tab lists every set you have created. At the start you have none, but can create up to 10. You can select a set by clicking on it, that will load it up into the workshop for further editing;
- The workshop area displays the currently selected set, that you can rename, or remove items from. If no set is selected, you can type in a name and click 'Save' to create a brand new one.
1
2
3
4
5
6
7
8
9
10
11
12
13
14
// redux/store.tsx
    import { configureStore } from "@reduxjs/toolkit";
    import collectibleSetsReducer from '../redux/slices/collectibleSetsSlice'
    import charactersReducer from './slices/charactersSlice';

    export const store = configureStore({
        reducer: {
            collectibleSets: collectibleSetsReducer,
            characters: charactersReducer,
        }
    })

    export type RootState = ReturnType<typeof store.getState>;
export type AppDispatch = typeof store.dispatch;- create the Redux store using the 'configureStore' method imported from Redux-toolkit (or RTK), which is a wrapper function around redux's 'createStore';
- the only option we need to pass at the moment is the root reducer, that is responsible for handling any changes made to the store. This parameter can either be a single root reducer function (if our state is simple for example), or an object containing all our reducers divided up by slice. 'Slice' is a redux term referring to a segment of our global state, if we imagine the store as a cake, one slice would be one small part of that global state;
- for this first version we are setting up 2 slices, one for the state related to the characters, and one for the collectible sets. Note that the keys used with the reducer object will become the name of the actual redux state, so chose them wisely. Behind the scenes, Redux-toolkit is combining all the reducers (with 'combineReducers') into one giant root reducer, but that part is handled for us here. Already we can see the toolkit making our lives easier;
- at the bottom of the file, we are exporting 2 types, one reflecting the structure of the redux state (obtained through 'store.getState'), and one for the dispatch method.
1
2
3
4
5
6
7
8
9
10
11
12
import { NavBar } from '../layout/navbar';
    import { store } from '../redux/store';
    import { Provider as ReduxProvider } from 'react-redux';

    export default function App() {
        return <div>
            <ReduxProvider store={store}>
                <NavBar />
                {/* content goes here */}
            </ReduxProvider>
        </div>;
    }
We mentioned the creation of two 'slices' of state, and that a slice is a fragment of the global redux store. The next step now is to take a look at these slices, starting with the simplest of the two: the Character slice.
1
2
3
4
5
6
7
8
9
10
11
12
13
14
15
16
17
18
19
20
21
22
23
24
25
26
// redux/slices/charactersSlice.tsx
    import { createSlice } from '@reduxjs/toolkit';
    import { CollectibleShell } from './collectibleSetsSlice';

    export interface CharactersCollectible extends CollectibleShell {
        name: string,
        type: 'character'
    };

    type CharactersState = CharactersCollectible[];

    const initialState: CharactersState = [{
        id: 1, name: 'Luke Skywalker', type: 'character'
    }, {
        id: 2, name: 'Leia Organa', type: 'character'
    }, {
        id: 8, name: 'Chewbacca', type: 'character'
    }];

    export const charactersSlice = createSlice({
        name: 'characters',
        initialState,
        reducers: { }
    })

export default charactersSlice.reducer;- lines 5 and 10 we have the definitions of an interface and a type that we'll use to represent one character, and the character slice state respectively. This way we define a character as possessing an id, a name and a type, while the state is an array of these characters;
- line 12 is where we configure the initial data that will be populating the 'characters' slice when we start the application. As mentioned earlier, this first version has only 3 collectibles available, and they are hardcoded here;
- line 20 shows how to create a slice, using the aptly named 'createSlice' utility function imported from the RTK. As parameter we can find a name, and the initial state, which we defined just before. The third parameter is an object of reducer functions, which exhaustively list every valid way the state within that slice can be updated. Again, for this version of the Star Wars game, characters are hardcoded so there is no way to update the state, thus there is no reducers;
- on line 26 we see another bit of help provided by redux-toolkit's 'createSlice', it makes it really easy to export the reducers, which are then imported to set up the store, as we've seen previously.
1
2
3
4
5
6
7
8
9
10
11
12
13
14
15
16
17
18
19
20
21
22
23
24
25
26
27
28
29
30
31
32
33
34
35
36
37
38
39
40
41
42
43
44
45
46
47
48
49
50
51
52
53
54
55
56
57
58
59
60
61
62
// redux/slices/collectibleSetsSlice.tsx
    import { PayloadAction, createSlice } from '@reduxjs/toolkit';
    import { RootState } from '../store';
    import { CharactersCollectible } from './charactersSlice';

    type CollectibleSetState = {
        setsList: CollectibleSet[],
        currentId: string | null
    }

    type CollectibleSet = {
        id: string,
        name: string,
        collectiblesList: CollectibleShell[]
    }

    export interface CollectibleShell {
        id: number,
        type: 'character' | 'planet' | 'starship'
    }

    const initialState: CollectibleSetState = {
        setsList: [],
        currentId: null,
    }

    export const collectibleSetsSlice = createSlice({
        name: 'collectibleSets',
        initialState,
        reducers: {
            setCreated: (state, action: PayloadAction<CollectibleSet>) => {
                // Redux Toolkit allows us to write "mutating" logic in reducers. It
                // doesn't actually mutate the state because it uses the Immer library,
                // which detects changes to a "draft state" and produces a brand new
                // immutable state based off those changes.
                // Also, no return statement is required from these functions.
                state.setsList.push(action.payload);
            },
            currentIdUpdated: (state, action: PayloadAction<string | null>) => {
                state.currentId = action.payload;
            },
            currentSetRenamed: (state, action: PayloadAction<string>) => {
                const currentSet = state.setsList.find(set => set.id === state.currentId);
                if (currentSet) {
                    currentSet.name = action.payload;
                }
            },
            pushedToSet: (state, action: PayloadAction<CollectibleShell>) => {
                const currentSet = state.setsList.find(set => set.id === state.currentId);
                currentSet?.collectiblesList.push(action.payload);
            },
            removedFromSet: (state, action: PayloadAction<number>) => {
                const currentSet = state.setsList.find(set => set.id === state.currentId);
                const itemIndex = currentSet?.collectiblesList.findIndex((item) => item.id == action.payload);
                if ((itemIndex !== undefined) && (itemIndex > -1)) {
                    currentSet?.collectiblesList.splice(itemIndex, 1);
                }
            }
        }
    })

// ... rest of the file is below- at first we have import statements and types definitions, nothing much to add to that;
- line 22 is the initial structure of the 'collectibleSets' slice of state, we see that is holds a list of sets, and an ID representing the set currently selected, which can be null when none are;
- line 27, same as before, we are using the createSlice from RTK to create the state;
- the main difference starts at line 30, as we created a bunch of reducers to perform certain modifications to the state. Each reducer is responsible for updating the state in a certain predictable way, for example how to create a set, rename a set, push an item to a set, etc;
- these reducers all take the current state as pamareter, and optionally an action, if additional data is required. Armed with these parameters, the reducer's job is to compute the new state, and update it;
- focusing on the first reducer 'setCreated', which is meant to add a new set of collectibles to the slice's state, we notice that the action must provide a payload containing the 'set to add', in order for the reducer to perform its task successfully;
- it isn't necessary to explain each reducer one by one, but it is essential to pay attention to the comment left in 'setCreated'. Indeed, when using redux toolkit's 'createSlice', we are allowed to write mutating code in the reducers (here we push a new set directly into the state), only because the toolkit uses Immer behind the scenes, which takes care of transforming the code to apply immutability principles. You must be careful to only write mutating code inside createSlice.
1
2
3
4
5
6
7
8
9
10
11
12
13
14
15
16
17
18
19
20
21
22
23
24
25
26
27
28
29
30
31
32
33
34
35
36
37
38
39
// redux/slices/collectibleSetsSlice.tsx
    // ... beginning of the file is above

    /***
     * Retrieves the whole set given by the currentId held in the state
     */
    export const currentSetSelector = (state: RootState): CollectibleSet | null => {
        if (!state.collectibleSets.currentId) {
            return null;
        } else {
            return state.collectibleSets.setsList.find(set => set.id === state.collectibleSets.currentId) || null;
        }
    }

    /***
     * Retrieves all collectibles in the set currently selected in the state
     */
    export const currentSetCollectibleListSelector = (state: RootState): CharactersCollectible[] => {
        const allCollectibles: CharactersCollectible[] = [];
        if (!state.collectibleSets.currentId) {
            return allCollectibles;
        } else {
            const currentSet = currentSetSelector(state);
            if (!currentSet) return allCollectibles;
            const characterIds: number[] = currentSet.collectiblesList.filter(collectible => collectible.type === 'character').map(character => character.id);
            return allCollectibles.concat(state.characters.filter(item => characterIds.includes(item.id)));
        }
    }

    /* createSlice automatically generates action creators for each
    reducer, so we don't have to write them ourselves */
    export const {
        setCreated,
        currentIdUpdated,
        currentSetRenamed,
        pushedToSet,
        removedFromSet } = collectibleSetsSlice.actions;

export default collectibleSetsSlice.reducer;- lines 7 and 18 are two selectors, which are basically a function returning a piece of the slice that we might need regularly. It is a shorthand to digging into the state ourselves every time we need to get hold of specific data. An added benefit is that if down the road, the structure of the state changes, we will only have to change the slice file, instead of every component selecting that state;
- notice that we are using 'RootState' to type the state coming in as parameter;
- we will see these selectors in action soon enough, when we will examine the components that are consuming the redux state;
- line 32 is yet another feature simplified by RTK, exporting pre-made actions objects, called action creators. Remember the gif in the intro, actions are the structures that need to be dispatched in order to know which reducer is called, and with which payload;
Technical details on actions creators
Up to this point, we've been examining files and methods specific to redux powered applications, which can seem unnecessary or overwhelming. You might be thinking "well that's a lot of code to use redux, I hope the benefits are worth the hassle!", and I do believe that they are. Although instead of taking my word for it, let's look at the actual React components making up the Star Wars game, and they will appear much simpler than if we'd decided to use React-only state management.1
2
3
4
5
6
7
8
9
10
11
12
13
14
15
16
17
18
19
20
21
22
23
24
25
26
27
28
29
30
31
32
// React component rendering a list of characters in the 'Catalogue' area
import { useSelector } from "react-redux"
import { RootState } from "../../../redux/store";
import { currentSetCollectibleListSelector, currentSetSelector, pushedToSet } from "../../../redux/slices/collectibleSetsSlice";
import { CharactersCollectible } from "../../../redux/slices/charactersSlice";
import { useDispatch } from "react-redux";
export const CharactersList = () => {
const characters = useSelector((state: RootState) => state.characters);
const currentSetId = useSelector(currentSetSelector)?.id;
const currentSetCharacterIds = useSelector(currentSetCollectibleListSelector).map((character: CharactersCollectible) => character.id);
const dispatch = useDispatch();
const addCharacterToCurrentSet = (id: number) => {
if (!currentSetId) {
alert('Please select a set first.')
return null;
}
dispatch(pushedToSet({ id, type: 'character' }));
}
return <>
Click on a character to add it to the current set
{characters.map(person => {
const isInSet = currentSetCharacterIds.includes(person.id);
return <div onClick={isInSet ? undefined : () => addCharacterToCurrentSet(person.id)} className={isInSet ? 'css when selected' : 'css when not selected'}>
{person.name}
{isInSet ? <SvgIconX /> : <SvgIconPlus />}
</div>
})}
</>;
}- on lines 9 and 10/11, are the first calls we're making to the 'useSelector' hook. On the former, we are manually selecting the piece of state we desire from the state, and with the latter, we are using one of the selector functions created within the collectibleSets slice, which is a shortcut to help us write cleaner code;
- line 14, is an event handler called when the user clicks on a character tile. It makes sure a set a selected, and then proceeds to dispatch the appropriate action to add the character to the set. Notice we are using an action creator, so we don't have to worry about making mistakes when passing the action object;
- the return is fairly simple, it is a couple of HTML tags and CSS whose colours changes whether the character is selected or not (actual CSS classes were omitted for clarity). One thing to mention though is that we do not call the event handler is the character is already in the set.
1
2
3
4
5
6
7
8
9
10
11
12
13
14
15
16
17
18
19
20
21
22
23
24
25
26
27
28
29
30
31
// React component rendering a list of collectibles in the 'Catalogue' area
import { useSelector, useDispatch } from "react-redux";
import { RootState } from "../../../redux/store";
import { currentIdUpdated, currentSetSelector } from "../../../redux/slices/collectibleSetsSlice";
export const CollectibleSetsList = () => {
const collectibleSets = useSelector((state: RootState) => state.collectibleSets.setsList)
const currentSetId = useSelector(currentSetSelector)?.id;
const dispatch = useDispatch();
const onCollectibleClicked = (newId: string) => {
dispatch(currentIdUpdated(newId))
}
const onNewSetRequested = () => {
dispatch(currentIdUpdated(null));
}
return <>
Click on a set to load it into the workshop
{collectibleSets.map((set, index) => (
<div key={index} onClick={() => onCollectibleClicked(set.id)}>
{set.name} {currentSetId === set.id && '(current)'}
{currentSetId === set.id ? <SvgIconCheck /> : <SvgIconEdit />}
</div>))}
{collectibleSets.length < 10 && <div onClick={onNewSetRequested}>
New
<SvgIconPlus />
</div>}
</>;
}- a rather simple simple component, with only two events handlers. 'onCollectibleClicked' fires up when a set is clicked, and dispatches an action to update the current id within the state slice. 'onNewSetRequested' does the opposite, clears up the state so that the application turns back to 'no set selected' mode;
- the returned HTML also follows the same pattern as previously, mapping through the list of collectibles sets the 'selectors' have fetched from the redux state, and displaying a tile for each, with or without certain CSS adjustments depending whether the set is the current one or not, or if we should display a 'New' button (up to 10 sets are allowed);
1
2
3
4
5
6
7
8
9
10
11
12
13
14
15
16
17
18
19
20
21
22
23
24
25
26
27
28
29
30
31
32
33
34
35
36
37
38
39
40
41
42
43
44
45
// React component rendering the input + save button of the 'Workshop' area
import { useState } from "react";
import { useDispatch, useSelector } from "react-redux";
import { currentSetRenamed, setCreated } from "../../../redux/slices/collectibleSetsSlice";
import { RootState } from "../../../redux/store";
import { nanoid } from "@reduxjs/toolkit";
type WorkshopNameInputProps = { currentSetName: string };
export const WorkshopNameInput = ({ currentSetName }: WorkshopNameInputProps) => {
const [workshopNameInput, setWorkshopNameInput] = useState(currentSetName);
const currentSetId = useSelector((state: RootState) => state.collectibleSets.currentId);
const dispatch = useDispatch();
const handleSaveSet = () => {
// if a set is selected, we rename it
if (currentSetId) {
dispatch(currentSetRenamed(workshopNameInput));
} else {
// otherwise, we create a new set
dispatch(setCreated({
id: nanoid(),
collectiblesList: [],
name: workshopNameInput
}))
setWorkshopNameInput('');
}
}
return <>
{currentSetName ? 'Current set:' : 'Create a set'}
<input
id="setName"
name="setName"
value={workshopNameInput}
onChange={({ currentTarget }) => {
setWorkshopNameInput(currentTarget.value)
}}/>
<button
disabled={workshopNameInput === currentSetName}
onClick={handleSaveSet}>
Save
</button>
</>;
}- it illustrates how React state management and Redux state management can very well work together when needed. Indeed, this component is subscribed to the 'current set id' of the collectibleSets slice, but also has its own React useState hook;
- this makes sense because the useState is taking care of the input where the user can rename a set, which is a very local state that is relevant only for this one component;
- it is a mistake to think "now that I went through the trouble of setting up Redux, I might as well use it every time I need to handle state". Redux state should be reserved for data needed across the whole application, or that requires a lot of logic to update consistently. For a simple use case like this input, React state is the best choice;
- another point of note, the 'handleSaveSet' event handler is conditionally dispatching actions. Unlike hooks, which can not be called conditionally, you can easily dispatch or not an action depending on any sort of condition;
- moreover, line 21, we can see how we build an action payload ourselves, generating an id and an empty collectible list, in order to create a new set. Please note that reducers must be pure functions, meaning no randomness or side effects are allowed within, this is why we are generating a random id in the action, and not within the reducer in charge of pushing the set into the state.
Debugging Redux with dev tools
Level 2 - Handling async logic using middleware
Basically middleware come into play between the dispatch of an action, and the actual reducer logic, as displayed below: (credits to redux.js.org for the image)
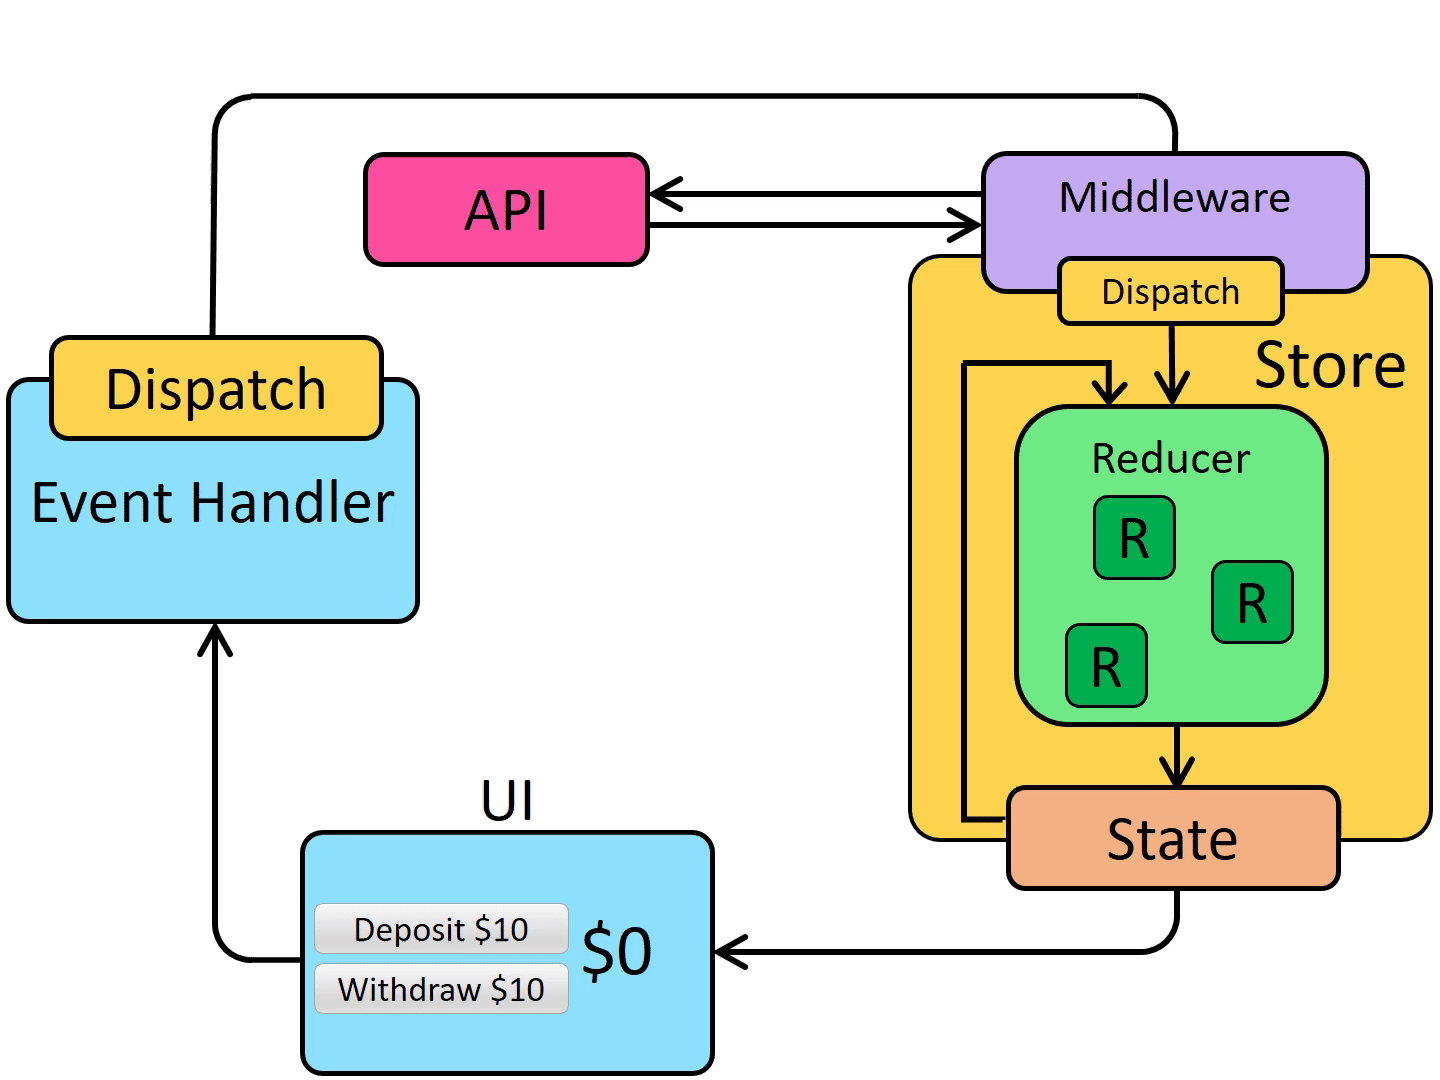 Redux workflow with middleware
Introducing delays and long calls to our application rhymes with loading state and network failures, thankfully Redux is providing us with guidelines on how to handle data fetching. One pattern is to add 'status' and 'error' attributes to each slices of state, in order to keep track of how the data fetching is going for each piece of state. Another one is to make sure our thunks are dispatching an action when the start fetching, or when encountering either a success or a failure. RTK once again is helping us out by providing a 'createAsyncThunk' utility, that will make it easier to enforce these patterns.
See below version 2 of the Star Wars shop application:
Star Wars Game Shop - v2
Catalogue - Create and arrange sets of collectibles by clicking on an item to include to the collection.
Workshop - Load up a set to rename it, or click on an item to remove it from the collection.
- no more fake data for characters, they are fetched using the public API swapi.tech, although limited to 10 items for now;
- planets collectibles are available, also fetched from the same API, and limited to 10 items;
- loading state is shown in each tab;
- renaming a set now is artificially delayed to last 3 seconds, and renaming to any string containing 'invalid' will fail. This feature is meant to illustrate how we can deal with errors happening within a thunk;
- reset button to clean up the redux store.
1
2
3
4
5
6
7
8
9
10
11
12
13
14
15
16
17
18
19
20
21
22
23
24
25
26
27
28
29
30
31
32
33
34
35
36
37
38
39
40
41
42
43
44
45
46
47
48
49
50
51
52
53
54
55
56
57
58
59
60
61
62
63
64
65
66
67
68
69
70
71
72
// redux/slices/planetsSlice.tsx
import { createAsyncThunk, createSlice, nanoid } from '@reduxjs/toolkit';
import { CollectibleShell } from '../v2/collectibleSetsSlice';
import { RootState } from '../../store';
export interface PlanetsCollectible extends CollectibleShell {
name: string,
price: number,
type: 'planet'
};
type PlanetsState = {
planetsList: PlanetsCollectible[],
status: 'idle' | 'loading' | 'succeeded' | 'error',
error: string | null
}
const initialState: PlanetsState = {
planetsList: [],
status: 'idle',
error: null
}
// Thunk action creator, can be dispatched like an action, but does async work
export const fetchPlanets = createAsyncThunk('planets/fetchPlanets', async () => {
const response = await fetch('https://swapi.tech/api/planets/');
const data = await response.json();
return data.results.map((planet: { name: string }) => ({
id: nanoid(),
name: planet.name,
type: 'planet',
}));
});
export const planetsSlice = createSlice({
name: 'planets',
initialState,
reducers: {
resetSlice: () => {
return initialState;
}
},
extraReducers(builder) {
builder
.addCase(fetchPlanets.pending, (state, action) => {
state.status = 'loading';
})
.addCase(fetchPlanets.fulfilled, (state, action) => {
state.status = 'succeeded';
state.planetsList = action.payload;
})
.addCase(fetchPlanets.rejected, (state, action) => {
state.status = 'error';
state.error = action.error.message || null;
})
}
})
/***
* Retrieves the number of planets in store
*/
export const planetsCountSelector = (state: RootState): number => {
return state.v2_planets.planetsList.length;
}
/* createSlice automatically generates action creators for each
reducer, so we don't have to write them ourselves */
export const {
resetSlice
} = planetsSlice.actions;
export default planetsSlice.reducer;- lines 12 and 18 is the first interesting change, applied to the structure of the slice's state. Instead of directly storing an array of data (fake data, in the case of the character slice in v1), we also are storing a status for the slice, along with possible errors, and finally the list of planet collectibles;
- line 24 is our first thunk action creator, generated through the 'createAsyncThunk' utility from RTK. The first parameter is the type of the action that will be dispatched every time we will use the thunk action, and the second is a 'payload creator' asynchronous function, which will become the payload of the action when called, after the long job has been done. In this case, the long job is to fetch a list of planets from the public API endpoint, and format it to keep only the name, an id that we generate, and the type;
- line 39 is the reducer we've added to handle the resetting of the state, which is fairly straightforward;
- line 43 introduces a special field called 'extraReducers', where we can add reducers in order to respond to action that are defined outside the 'regular' reducers generated from createSlice. In this instance, we want a reducer capable of handling the action type created just above, 'planets/fetchPlanets';
- you may have noticed that we actually added 3 reducers, one for each possible state of the asynchronous call. These three states are created automatically by using 'createAsyncThunk', and as you can see, it is easy to feed them to the extraReducers section. The possible states are 'pending', in which we set the status of the slice accordingly, 'error' which is called if the thunk promise is rejected, and 'fulfilled' which is called when the thunk promise has been resolved successfully;
- we implemented the thunk action creator in such a way that it returns a mapped array of objects, that we can directly plug into the state. Indeed, the returned value of the thunk becomes the payload of the following reducer, which is why we can set 'state.planetsList = action.payload' directly.
1
2
3
4
5
6
7
8
9
10
11
12
13
14
15
16
17
18
19
20
21
22
23
24
25
26
27
28
29
30
31
32
33
34
35
36
37
38
39
40
41
42
43
44
45
46
47
48
49
50
51
52
53
54
55
56
57
58
59
60
61
62
63
64
65
66
67
68
69
70
71
72
73
74
// redux/slices/starWarsWidget.tsx
import { GameShopTabs } from "./gameShopTabs";
import { useEffect, useState } from "react";
import { CharactersList } from "./charactersList";
import { CollectibleSetsList } from "./collectibleSetsList";
import { WorkshopArea } from "./workShopArea";
import { PlanetsList } from "./planetsList";
import { useDispatch, useSelector } from "react-redux";
import { AppDispatch, RootState } from "../../../../redux/store";
import { fetchPlanets, resetSlice as resetPlanetSlice } from "../../../../redux/slices/v2/planetsSlice";
import { fetchCharacters, resetSlice as resetCharacterSlice } from "../../../../redux/slices/v2/charactersSlice";
import { resetSlice as resetCollectibleSetsSlice } from "../../../../redux/slices/v2/collectibleSetsSlice";
export default function StarWarsGame() {
const [currentTab, setCurrentTab] = useState<string>('Characters');
const charactersSliceStatus = useSelector((state: RootState) => state.v2_characters.status)
const planetsSliceStatus = useSelector((state: RootState) => state.v2_planets.status)
const dispatch = useDispatch<AppDispatch>();
useEffect(() => {
if (charactersSliceStatus === 'idle') {
dispatch(fetchCharacters());
}
}, [dispatch, charactersSliceStatus])
useEffect(() => {
if (planetsSliceStatus === 'idle') {
dispatch(fetchPlanets());
}
}, [dispatch, planetsSliceStatus])
const handleTabChange = (newTab: string) => {
setCurrentTab(newTab);
}
const resetState = () => {
dispatch(resetCharacterSlice());
dispatch(resetPlanetSlice());
dispatch(resetCollectibleSetsSlice());
}
const content = () => {
switch (currentTab) {
case 'Characters':
return <CharactersList />;
case 'Planets':
return <PlanetsList />;
case 'Collectible sets':
return <CollectibleSetsList />;
}
}
return <div>
<button
disabled={charactersSliceStatus === 'loading' || planetsSliceStatus === 'loading'}
onClick={resetState}
>
{(charactersSliceStatus === 'loading' || planetsSliceStatus === 'loading') ? <LoadingLogo /> : <>Reset</>}
</button>
<div>Star Wars Game Shop - v2</div>
<div>
Catalogue - Create and arrange sets of collectibles by clicking on an item to include to the collection.
<GameShopTabs
onTabChange={handleTabChange}
currentTab={currentTab}
/>
{content()}
</div>
<div>
Workshop - Load up a set to rename it, or click on an item to remove it from the collection.
<WorkshopArea />
</div>
</div>
}- lines 15 to 18, are a bunch of hooks, to handle swithing between tabs, or select a piece of state, nothing really new;
- lines 20 and 26, are two useEffect hooks to synchronise the API calls with the rendering of our application. In both case, if the status of slice is 'idle', it is sign that we wish to fetch data for that slice, which will either result in a 'suceeded' or 'error' status. We can also observe that the thunk action creators are called in just the same way as the regular action creators we've used up to this point;
- line 36, is the event handler calling the necessary actions to reset our redux store clean;
- line 53, in the render, we are using the loading status of the slices to indicate to the user that the application is working behind the scene, so they won't get impatient.
1
2
3
4
5
6
7
8
9
10
11
12
13
14
15
16
17
18
19
20
21
22
23
24
25
26
27
28
29
30
31
32
33
34
35
36
37
38
39
40
41
42
43
44
45
46
47
48
49
50
51
52
53
54
55
56
57
58
59
60
61
62
63
64
65
66
67
68
69
70
71
72
73
74
75
76
77
78
79
80
81
82
83
84
85
86
// redux/slices/collectibleSetsSlice.tsx
    import { PayloadAction, createAsyncThunk, createSlice, nanoid } from '@reduxjs/toolkit';
    import { RootState } from '../../store';
    import { SliceStatus } from './charactersSlice';

    // ... omitted for brevity ...

    const initialState: CollectibleSetState = {
        setsList: [],
        currentId: null,
        status: 'idle',
        error: null,
    }

    export const collectibleSetsSlice = createSlice({
        name: 'collectibleSets',
        initialState,
        reducers: {
            resetSlice: () => {
                return initialState;
            },
            setCreated: {
                reducer(state, action: PayloadAction<CollectibleSet>) {
                    state.setsList.push(action.payload);
                },
                prepare(name: string) {
                    return {
                        payload: {
                            id: nanoid(),
                            name,
                            collectiblesList: []
                        }
                    }
                }
            },
            // ... other reducers omitted ...
        },
        extraReducers(builder) {
            builder
                .addCase(longRenameCurrentSet.pending, (state) => {
                    state.status = 'loading';
                })
                .addCase(longRenameCurrentSet.fulfilled, (state, action) => {
                    state.status = 'succeeded';
                    state.error = null;
                    const currentSet = state.setsList.find(set => set.id === state.currentId);
                    if (currentSet) {
                        currentSet.name = action.payload;
                    }
                })
                .addCase(longRenameCurrentSet.rejected, (state, action) => {
                    state.status = 'error';
                    state.error = action.error.message || null;
                })
        }
    })

    // Thunk action creator, can be dispatched like an action, but does async work
    export const longRenameCurrentSet = createAsyncThunk('v2_collectibleSets/longRenameCurrentSet', async (name: string) => {
        const whyDoesItTakeSoLongToRename = new Promise<string>((resolve, reject) => {
            setTimeout(() => {
                name.includes('invalid') ? reject('Invalid name') : resolve(name);
            }, 3000);
        });
        return whyDoesItTakeSoLongToRename;
    })

    /***
     * Retrieves all collectibles in the set currently selected in the state
     */
    export const currentSetCollectibleListSelector = (state: RootState): CollectibleShell[] => {
        const allCollectibles: CollectibleShell[] = [];
        if (!state.v2_collectibleSets.currentId) {
            return allCollectibles;
        } else {
            const currentSet = currentSetSelector(state);
            if (!currentSet) return allCollectibles;
            // Retrieves the characters
            const characterIds: number[] = currentSet.collectiblesList.filter(collectible => collectible.type === 'character').map(character => character.id);
            allCollectibles.push(...state.v2_characters.charactersList.filter(item => characterIds.includes(item.id)));
            // Retrieves the planets
            const planetIds: number[] = currentSet.collectiblesList.filter(collectible => collectible.type === 'planet').map(planet => planet.id);
            allCollectibles.push(...state.v2_planets.planetsList.filter(item => planetIds.includes(item.id)));
            return allCollectibles;
        }
}- line 8, in the same fashion as we did for the planets and characters slices, we added some extra attributes to the state in order to reflect the status of the slice, as well as a possible error message;
- line 22 is a small change from the v1 when it comes to creating a set. Before, we used to generate the id as we called the payload, in the React component, and the reducer just pushed the entire payload into the state. The problem with that approach was if we wanted to provide the 'set creation' feature from many different components, we'd have to duplicate as many times the code to generate the payload and the id that goes with it. Instead we can define a 'payload callback' that will take care of generating the payload structure for us, thus removing the logic out of the components, for better reusability. The only parameter the components need to pass is the name of the set, and the 'prepare callback' generates the id and the empty list of collectibles;
- line 38, similar to what we did for the other slices, we leveraged the 'extraReducers' section to listen to the actions dispatched by the thunk action creator 'longRenameCurrentSet'. What goes on inside each reducer is also similar to previously, we want to update the status and only rename the set if the thunk was successful;
- line 59 is the actual thunk action creator, which takes the new name as parameter, and tries to update it. For the sake of the example, this thunk only delays the resolution by 3 seconds, and then rejects the promise only if the new name contains 'invalid', so we can easily try several scenarios. We simply return the promise from the thunk function, and RTK's 'createAsyncThunk' will automatically dispatch the appropriate action upon success/failure, so that the correct reducer is called;
- line 71 is the selector we had in v1, updated to support planets collectibles.
1
2
3
4
5
6
7
8
9
10
11
12
13
14
15
16
17
18
19
20
21
22
23
24
25
26
27
28
29
30
31
32
33
34
35
36
37
38
39
40
41
42
43
44
45
// redux/slices/workShopNameInput.tsx
    import { useDispatch, useSelector } from "react-redux";
    import { longRenameCurrentSet, setCreated } from "../../../../redux/slices/v2/collectibleSetsSlice";
    import { AppDispatch, RootState } from "../../../../redux/store";
    import { Input } from "../../../input";

    type WorkshopNameInputProps = { currentSetName: string };
    export const WorkshopNameInput = ({ currentSetName }: WorkshopNameInputProps) => {
        const [workshopNameInput, setWorkshopNameInput] = useState(currentSetName);
        const currentSetId = useSelector((state: RootState) => state.v2_collectibleSets.currentId);
        const sliceStatus = useSelector((state: RootState) => state.v2_collectibleSets.status);
        const error = useSelector((state: RootState) => state.v2_collectibleSets.error) || '';

        const dispatch = useDispatch<AppDispatch>();

        const handleSaveSet = () => {
            // if a set is selected, we rename it
            if (currentSetId) {
                dispatch(longRenameCurrentSet(workshopNameInput));
            } else {
                // otherwise, we create a new set
                dispatch(setCreated(workshopNameInput))
                setWorkshopNameInput('');
            }
        }

        return (<div>
            <Input
                name={'setName'}
                label={currentSetName ? 'Current set:' : 'Create a set'}
                value={workshopNameInput}
                error={error}
                horizontal
                onChange={newVal => {
                    setWorkshopNameInput(newVal);
                }}
            />
            <button
                disabled={workshopNameInput === currentSetName}
                onClick={handleSaveSet}
            >
                {sliceStatus === 'loading' ? <LoadingLogo /> : <>Save</>}
            </button>
    </div>)
}- we are still keeping the state controlling the input as a React state, as only that component needs to have access to the information;
- line 19 is where we call the thunk action creator function that will rename a set. On the following line, is the regular action used to create a set, and this one only accepts one parameter, the name of the set to be created. We were able to delete the part about using nanoid to create an id, since that part is done by the 'prepare callback' of the setCreated reducer, as explained previously.
Extra mile - Debugging thunks with dev tools
Level 3 - Improving performances and normalising data
Star Wars Game Shop - v3
Catalogue - Create and arrange sets of collectibles by clicking on an item to include to the collection.
Workshop - Load up a set to rename it, or click on an item to remove it from the collection.
- starships collectibles become available;
- pagination to browse through data sent by the API. Data is stored in state in order to be fetched only once, when a new page is requested. If the user goes back to a page previously requested, the data will be instantaneously available;
- sets are now limited to 10 items each;
- normalised state and better performance, which will be detailed in a bit;
- ability to persist the collectible sets to the database, so you can see them even after reloading the page. Be careful though, only 10 sets are allowed, and they are shared between every person using the website, so play nice!
State normalisation
 State normalisation
With that basic explanation out of the way, let's see of all this applies to the Star Wars game shop, and the new starship slice:
1
2
3
4
5
6
7
8
9
10
11
12
13
14
15
16
17
18
19
20
21
22
23
24
25
26
27
28
29
30
31
32
33
34
35
36
37
38
39
40
41
42
43
44
45
// redux/slices/starshipsSlice.tsx
    // ... omits imports

    export type Pagination = {
        currentPage: number,
        hasNextPage: boolean,
        hasPreviousPage: boolean,
        total?: number
    };

    type StarshipsState = EntityState<StarshipsCollectible, EntityId> & {
        status: SliceStatus,
        error: string | null,
        pagination: Pagination,
    }

    const starshipsAdapter = createEntityAdapter<StarshipsCollectible>();

    const initialState = starshipsAdapter.getInitialState({
        status: 'idle',
        error: null,
        pagination: {
            currentPage: 1,
            hasNextPage: true,
            hasPreviousPage: false,
        }
    }) as StarshipsState;

    export const starshipsSlice = createSlice({
        name: 'v3_starships',
        initialState,
        reducers: {
            // ... omits reducers
        }
    })

    // Export the customized selectors for this adapter using 'getSelectors'
    export const {
        selectAll: selectAllStarships,
        selectById: selectStarshipById,
        selectIds: selectStarshipsIds
        // Pass in a selector that returns the posts slice of state
    } = starshipsAdapter.getSelectors((state: RootState) => state.v3_starships)

export default starshipsSlice.reducer;- line 4 is the type we defined to handle pagination, which we'll cover later on. It is part of the state though, so it needs to be initialised as well;
- line 11 is the type for the new structure of the slice. It is made of two parts, one is 'EntityState' which is the type of a normalised state expected by RTK (more on this on the next bullet point), and the other is the three custom attributes we want to add to the state, in this case 'status', 'error' and 'pagination';
- line 17 is how we leverage RTK's 'createEntityAdapter' to generate the normalised state for us, along with a bunch of useful pre-made reducers and selectors ready to interact with that state. We feed it the type of the state we wish to create. The 'EntityState{'<'}StarshipsCollectible, EntityId{'>'}' means that the normalised state we'll have an object of entities of type 'StarshipsCollectible', and an array of ids (called EntityIds). 'entities' and 'ids' are the minimum structure, in the example we added also 3 custom parameters. So the final slice structure will be like so:
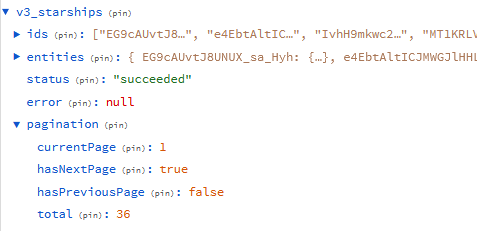 Starship normalised state
 - line 19, we set the state's initial value using the adapter's 'getInitialState' function. Redux toolkit takes care of initialising the 'ids' and 'entities' attributes, so we need to worry only about the 3 customs attributes, status, error and pagination;
- line 29 is the creation of the slice, it hasn't changed. Some of the reducers need to be refactored to cater for the new structure of the state though, we will go through it in more details in just a little while;
- line 38 is the export of some of the selectors automatically generated by RTK, which is going to make working with the entities easier.
1
2
3
4
5
6
7
8
9
10
11
12
13
14
15
16
17
18
19
20
21
22
23
24
25
26
27
28
29
30
31
// redux/slices/starshipsSlice.tsx

    // ... omits rest of the slice
    reducers: {
        resetSlice: () => {
            return initialState;
        },
        changePage: (state, action: PayloadAction<number>) => {
            state.pagination = {
                currentPage: action.payload,
                hasNextPage: action.payload !== (state.pagination.total ? Math.ceil(state.pagination.total / 10) : 0),
                hasPreviousPage: action.payload !== 1,
                total: state.pagination.total
            }
        }
    },
    extraReducers(builder) {
        builder
            .addCase(fetchStarships.pending, (state, action) => {
                state.status = 'loading';
            })
            .addCase(fetchStarships.fulfilled, (state, action: PayloadAction<{ pagination: Pagination, data: StarshipsCollectible[] }>) => {
                state.status = 'succeeded';
                state.pagination = action.payload.pagination;
                starshipsAdapter.upsertMany(state, action.payload.data);
            })
            .addCase(fetchStarships.rejected, (state, action) => {
                state.status = 'error';
                state.error = action.error.message || null;
            })
}- line 8, we can see that we've added a reducer to handle pagination, whose job is to update the page number currently viewed, as well as whether a next/previous page is available or not;
- line 22, is the case of a fetch promise being fulfilled successfully, which results in adding data to the state. This is not done by pushing the data into the state manually, but rather by calling the 'upsertMany' function, which adds whatever parameter it receives into the 'entities' object maintained by the slice (here, a list of 'StarshipsCollectible'), plus it also updates the 'ids' array accordingly;
- line 24, we notice that the pagination needs also to be updated upon a successful request for new starships, as the total number of items, and whether a next page exists, are returned by the API;
1
2
3
4
5
6
7
8
9
10
11
12
13
14
15
16
17
18
19
20
21
22
23
24
25
26
27
28
29
30
31
32
33
34
35
36
37
// redux/slices/starshipsSlice.tsx
    // ... omits rest of the slice

    // Thunk action creator, can be dispatched like an action, but does async work
    export const fetchStarships = createAsyncThunk('v3_starships/fetchStarships', async (page: number) => {
        const response = await fetch('https://swapi.tech/api/starships/?page=' + page);
        const data = await response.json();

        const pagination: Pagination = {
            currentPage: page,
            hasNextPage: Boolean(data.next),
            hasPreviousPage: Boolean(data.previous),
            total: data.count
        }
        return {
            pagination,
            data: data.results.map((starship: { name: string }) => ({
                id: nanoid(),
                name: starship.name,
                type: 'starship',
            }))
        };
    });

    //  Retrieves the number of starships in store
    export const starshipsCountSelector = (state: RootState): number => {
        return Object.values(state.v3_starships.entities).length;
    }

    //  Retrieves starships from the Nth page
    export const selectStarshipsByPage = (state: RootState, page: number) => {
        // Selects ids between 0 and 9 for 1st page, 10 and 19 for 2nd page, etc.
        const idsOnThatPage = state.v3_starships.ids.filter((_, index) => (index < (page * 10)) && (index >= (page * 10 - 10)));
        const starshipsOnThatPage: StarshipsCollectible[] = [];
        idsOnThatPage.forEach(id => starshipsOnThatPage.push(state.v3_starships.entities[id]));
        return starshipsOnThatPage;
}- block line 5 shows the updated thunk action creator, which now takes the page number as parameter. It is performing the call as previously, and passing on the data to the reducer, but also processes pagination data from the API;
- line 26, the selector returning the count of starships items also has to be updated to reflect the new structure. We are now counting the number of entities, instead of the length of an array like in v2;
- block line 31 is a selector to retrieve starships featured on a certain page. For this we are leveraging the array of ids maintained by RTK's entity adapter.
1
2
3
4
5
6
7
8
9
10
11
12
13
14
15
16
17
18
19
20
21
22
23
24
25
26
27
28
29
30
31
32
33
34
35
36
37
38
39
40
41
42
43
44
45
46
47
// redux/slices/collectibleSetsSlice.tsx
    // ... omits imports
    type CollectibleSet = {
        id: EntityId,
        name: string,
        charactersList: EntityId[],
        planetsList: EntityId[],
        starshipsList: EntityId[],
    }

    type CollectibleSetState = EntityState<CollectibleSet, EntityId> & {
        currentId: EntityId | null,
        status: SliceStatus,
        error: string | null,
    }

    export interface CollectibleShell {
        id: EntityId,
        name?: string,
        type: 'character' | 'planet' | 'starship'
    }

    const collectibleSetsAdapter = createEntityAdapter<CollectibleSet>();

    const initialState = collectibleSetsAdapter.getInitialState({
        currentId: null,
        status: 'idle',
        error: null,
    }) as CollectibleSetState;

    export const collectibleSetsSlice = createSlice({
        name: 'v3_collectibleSets',
        initialState,
        reducers: {
            // omits reducers
        }
    })

    // Export the customized selectors for this adapter using 'getSelectors'
    export const {
        selectAll: selectAllCollectibleSets,
        selectById: selectCollectibleSetById,
        selectIds: selectCollectibleSetsIds
        // Pass in a selector that returns the posts slice of state
    } = collectibleSetsAdapter.getSelectors((state: RootState) => state.v3_collectibleSets)

export default collectibleSetsSlice.reducer;- line 23, we are creating the entity adapter through RTK, so that the normalised state is created for us. We are passing the state type as defined;
- line 31, we are creating the slice, using the initial state just as before. One major difference is that we split up the collectibles to have their own array. This way it will be easier to use the ids without worrying about the type of each collectible. This is part of the normalisation process, we want only one copy of each datum in the state;
- line 40 is the export of the pre-made selectors RTK is providing us with.
1
2
3
4
5
6
7
8
9
10
11
12
13
14
15
16
17
18
19
20
21
22
23
24
25
26
27
28
29
30
31
32
33
34
35
// redux/slices/collectibleSetsSlice.tsx
    // ... omits rest of the slice
    reducers: {
        setCreated: {
            reducer(state, action: PayloadAction<CollectibleSet>) {
                // state.setsList.push(action.payload); <-- in v2, the reducer looked like that
                collectibleSetsAdapter.addOne(state, action.payload);
            },
            prepare(name: string) {
                return {
                    payload: {
                        id: nanoid(),
                        name,
                        charactersList: [],
                        planetsList: [],
                        starshipsList: [],
                    }
                }
            }
        },
        pushedToSet: (state, action: PayloadAction<CollectibleShell>) => {
            if (!state.currentId) return;
            const currentSet = state.entities[state.currentId];
            if (action.payload.type === 'character') {
                currentSet.charactersList.push(action.payload.id);
            } else if (action.payload.type === 'planet') {
                currentSet.planetsList.push(action.payload.id);
            } else {
                currentSet.starshipsList.push(action.payload.id);
            }
            // const currentSet = state.setsList.find(set => set.id === state.currentId);  <-- in v2, the reducer looked like that
            // currentSet?.collectiblesList.push(action.payload);
        },
        // ... other reducers
}- line 4, to create a set, we are leveraging the adapter's 'addOne' reducer function, which will update both the entities object, and the ids array for us;
- line 21, is the reducer that adds an item to the current set. There is no pre-made reducer for this task, so we need to update it manually, it turns out a little more complex than before because we now have 3 arrays of collectibles instead of 1, but we'll quickly see that this tradeoff works heavily in our favour in the end.
1
2
3
4
5
6
7
8
9
10
11
12
13
14
15
16
17
18
19
20
21
22
23
24
25
26
27
28
29
30
31
32
33
34
35
36
37
38
39
40
41
42
43
44
45
46
47
48
49
50
51
52
53
54
55
56
57
58
59
60
61
62
63
64
65
66
// React component rendering a list of Starships in the 'Catalogue' area
    // ... omits imports
    export const StarshipsList = () => {
        const pagination = useSelector((state: RootState) => state.v3_starships.pagination);
        const starshipsCount = useSelector(selectAllStarships).length;
        const starships = useSelector((state: RootState) => selectStarshipsByPage(state, pagination.currentPage));
        const currentSetId = useSelector(currentSetSelector)?.id;
        const currentSetLength = useSelector(currentSetCount);
        const currentSetStarshipIds: EntityId[] = useSelector((state: RootState) => selectCollectibleSetById(state, currentSetId || 0)?.starshipsList) || [];
        const sliceStatus = useSelector((state: RootState) => state.v3_starships.status);
        const error = useSelector((state: RootState) => state.v3_starships.error);
        const dispatch = useDispatch<AppDispatch>();

        const addStarshipToCurrentSet = (id: EntityId) => {
            if (!currentSetId) {
                alert('Please select a set first.')
                return null;
            }
            if (currentSetLength >= 10) {
                alert('Set can not contain more than 10 items.');
                return null;
            }
            dispatch(pushedToSet({ id, type: 'starship' }));
        }

        const onChangePage = (page: number) => {       // we already have the starships loaded in store if ...
            if ((page < pagination.currentPage)                 // ... we go to the previous page
                || (starshipsCount >= (page * 10))                // ... we go to the next page, but it has already been visited before
                || (starshipsCount === pagination.total)) {   // ... we go to the next page, but all starships are loaded already
                dispatch(changePage(page));
            } else {
                // else, we need to fetch another page of characters from the API
                dispatch(fetchStarships(page));
            }
        }

        const content = () => {
            if (sliceStatus === 'loading') {
                return <LoadingLogo />;
            } else if (sliceStatus === 'error') {
                return <div>{error}</div>;
            } else if (sliceStatus === 'succeeded') {
                return <>
                <>Click on a starship to add it to the current set</>
                {starships.map(starship => {
                    const isInSet = currentSetStarshipIds.includes(starship.id);
                    return (<div key={starship.id} onClick={isInSet ? undefined : () => addStarshipToCurrentSet(starship.id)}>
                        <StarshipIcon />
                        {starship.name}
                        {isInSet ? <XIcon /> : <PlusIcon />}
                    </div>
                )})}
                <PaginationButtons
                    currentPage={pagination.currentPage}
                    onPrevious={() => onChangePage(pagination.currentPage - 1)}
                    disablePrevious={!pagination.hasPreviousPage}
                    onNext={() => onChangePage(pagination.currentPage + 1)}
                    disableNext={!pagination.hasNextPage}
                />
                </>
            } else {
                return null;
            }
        };
        return content();
}- no need to explain every selectors at this point, nonetheless line 9, it is worth noticing that we are using the starships's entity adapter's automatically-generated selectors. It's one of the pre-made functions that RTK has made available when we create the normalised state with 'createEntityAdapter', and we can see it is easy to use like any other selectors. Here we are passing the state and the id of a collectible set, and the selector will retrieve that data for us, from the entities object within the store;
- line 26 is the logic to handle pagination. See the comments for each scenarios, some require only to update the 'pagination' attribute of state, because the data is already loaded. On the other hand, if the page requested has never been loaded, we are still forced to make a call to the API to fetch it (the pagination is also updated when we are processing the API's response);
- this way to handle pagination is useful because we are not making any redundant calls to the API, each page is fetched once, and kept in store for immediate retrieval in case we need it again;
- the render is not very different from v2, we are displaying either a loading icon, an error or the data as a list. The novelty is the pagination component, which simply displays 2 arrows, and receives callbacks to request a change of page.
Selector memoization with RTK's createSelector
As we'll see soon enough, selectors are called a great number of times, because every time the store changes, every selector is re-run in order to know if the data has changed for each of the components that subscribed to it. Of course, a real-life application involves many selectors, and the state changes often, so not keeping 'in mind' the previous result of a selector, to serve it right away if the next call is for the same parameters, can greatly improve the overall fluidity of the application.
Don't worry if this sounds arcane still, we'll jump straight to an example with the starship slice. See below the code for the selector retrieving starships for a given page:
1
2
3
4
5
6
7
8
9
10
// redux/slices/starshipsSlice.tsx
    //  Retrieves starships from the Nth page - not memoized
    export const selectStarshipsByPage = (state: RootState, page: number) => {
        console.log('Starship selector is working ...');
        // Selects ids between 0 and 9 for 1st page, 10 and 19 for 2nd page, etc.
        const idsOnThatPage = state.v3_starships.ids.filter((_, index) => (index < (page * 10)) && (index >= (page * 10 - 10)));
        const starshipsOnThatPage: StarshipsCollectible[] = [];
        idsOnThatPage.forEach(id => starshipsOnThatPage.push(state.v3_starships.entities[id]));
        return starshipsOnThatPage;
} 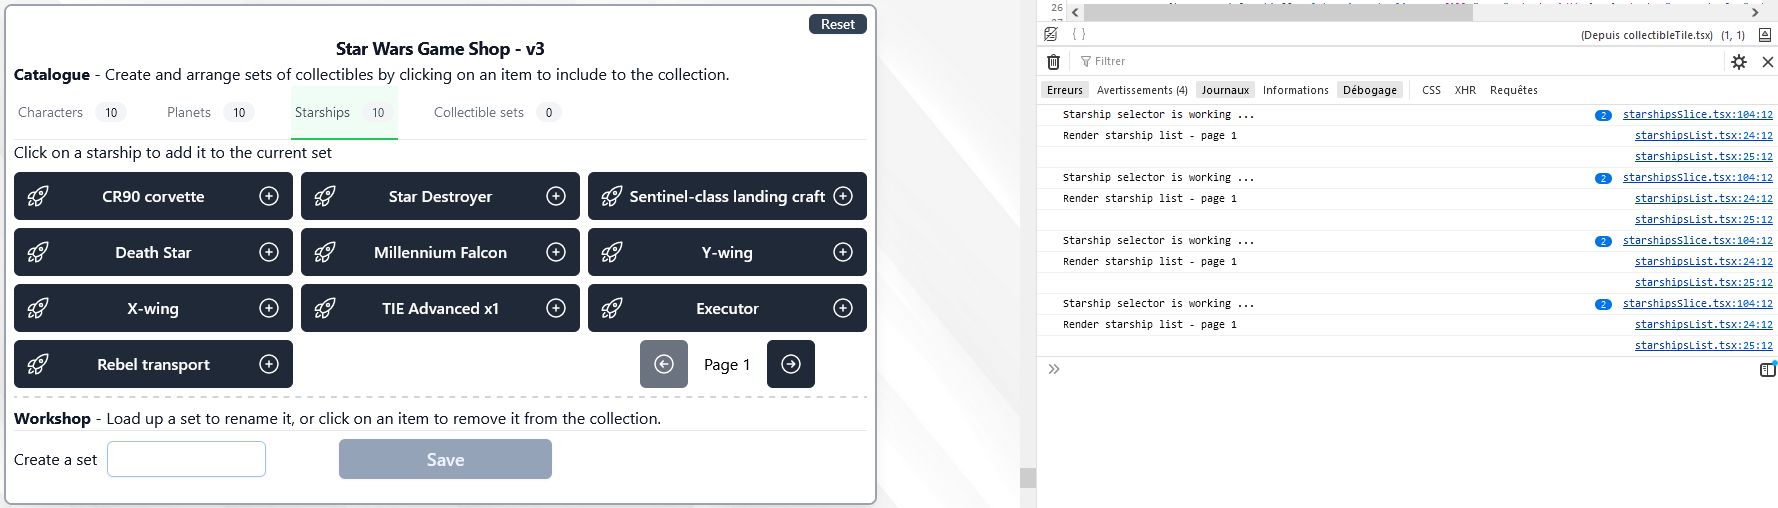 Selector fetching starship by page - not memoized
Okay now with the memoized version:
1
2
3
4
5
6
7
8
9
10
11
12
13
14
15
// redux/slices/starshipsSlice.tsx
    //  Retrieves starships from the Nth page - memoized
    export const selectStarshipsByPage = createSelector(
        [(state: RootState) => state.v3_starships.entities, // <- input selector #1
        (state: RootState) => state.v3_starships.ids,         // <- input selector #2
        (_, pageNumber: number) => pageNumber],      // <- input selector #3
        (allStarships, idsOrdered, pageNumber) => {      // <- output selector
            console.log('Starship selector is working ...');
            // Selects ids between 0 and 9 for 1st page, 10 and 19 for 2nd page, etc.
            const idsOnThatPage = idsOrdered.filter((_, index) => (index < (pageNumber * 10)) && (index >= (pageNumber * 10 - 10)));
            const starshipsOnThatPage: StarshipsCollectible[] = [];
            idsOnThatPage.forEach(id => starshipsOnThatPage.push(allStarships[id]));
            return starshipsOnThatPage;
        }
); Selector fetching starship by page - memoized
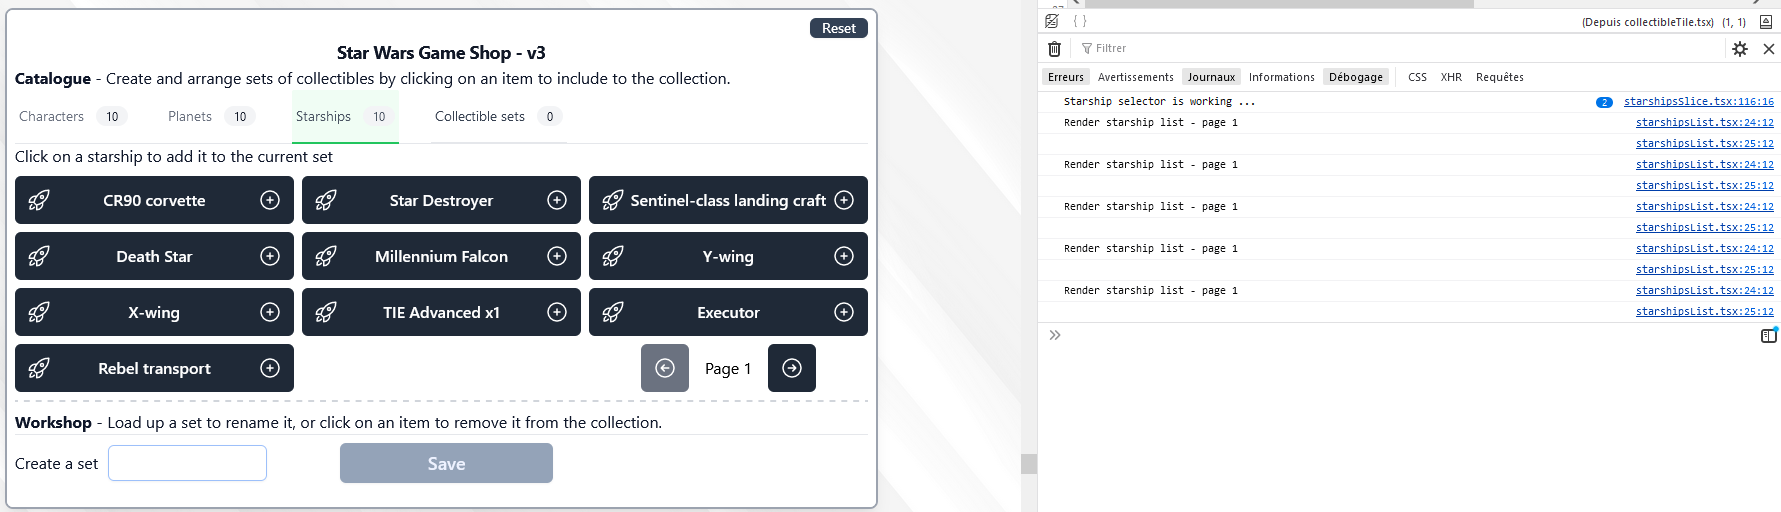
- line 3, we are using 'createSelector' from Redux toolkit to generate the memoized function for us. This method actually comes from theReselect library, but is re-exported by RTK for our convenience. It takes two parameters, first, an array of 'input selectors', and second, a 'output selector'. The magic is that the output selector will be executed only if one or more of the input selectors have returned a different value (compared to the last execution), if not, then the selectors' previously returned value will simply be returned again, without further computation;
- when the memoized selector is called by a React component, each of the input selectors are called with the same parameters, one after the other. In the example above, each will receive two parameters, 'state' and 'pageNumber'. They will each run their code, and provide their results to the output selector, which will decide whether it needs to run again or not;
- line 4 is the first input selector, it is using only the first parameter 'state', and returns the all starships entities;
- line 5 is the second input selector, it is also only using the 'state', and returns the all starships ids, which are ordered, unlike the entities;
- line 6 is the third input selector, which is not using the state, but the page number only, and simply transmits it;
- line 7 is the output selector, it takes as many parameter as we have input selectors. Here we have written 3 input selectors, so the output selector will receive 3 parameters, one or each. At this point, if all 3 references are identical from the previous execution, then the previous value is returned immediately. If one or more of the references have changed, the output selector will run again, and return a value, which will again be 'memoized' for the next time we call it;
- what this means in practice, if the info we have about all starships hasn't changed + if we haven't received any new starships + the page number hasn't changed, since the last call to the selector, we can safely return the same value as before, because nothing has changed;
- when the selector was not memoized, we were creating a new reference for the 'starshipsOnThatPage' array on every execution, that is the sign that we can improve performance by memoizing it.
1
2
3
4
5
6
7
8
9
10
11
12
13
14
15
16
17
18
19
20
// redux/slices/collectibleSetsSlice.tsx
    //  Retrieves all collectibles of a certain type, within the current set - not memoized
    export const currentSetCollectibleByTypeSelector = (state: RootState, type: 'character' | 'planet' | 'starship'): EntityId[] => {
        console.log('Collectible set selector by type is working ...');
        const currentSet = currentSetSelector(state);
        if (!currentSet) return [];
        switch(type) {
            case 'character': {
                return currentSet.charactersList;
            }
            case 'planet': {
                return currentSet.planetsList;
            }
            case 'starship': {
                return currentSet.starshipsList;
            }
            default:
                return []
        }
} Selector fetching collectibles by type - not memoized
See below the memoized version of the same selector:
1
2
3
4
5
6
7
8
9
10
11
12
13
14
15
16
17
18
19
20
21
22
23
// redux/slices/collectibleSetsSlice.tsx
// Retrieves all collectibles of a certain type, within the current set - memoized
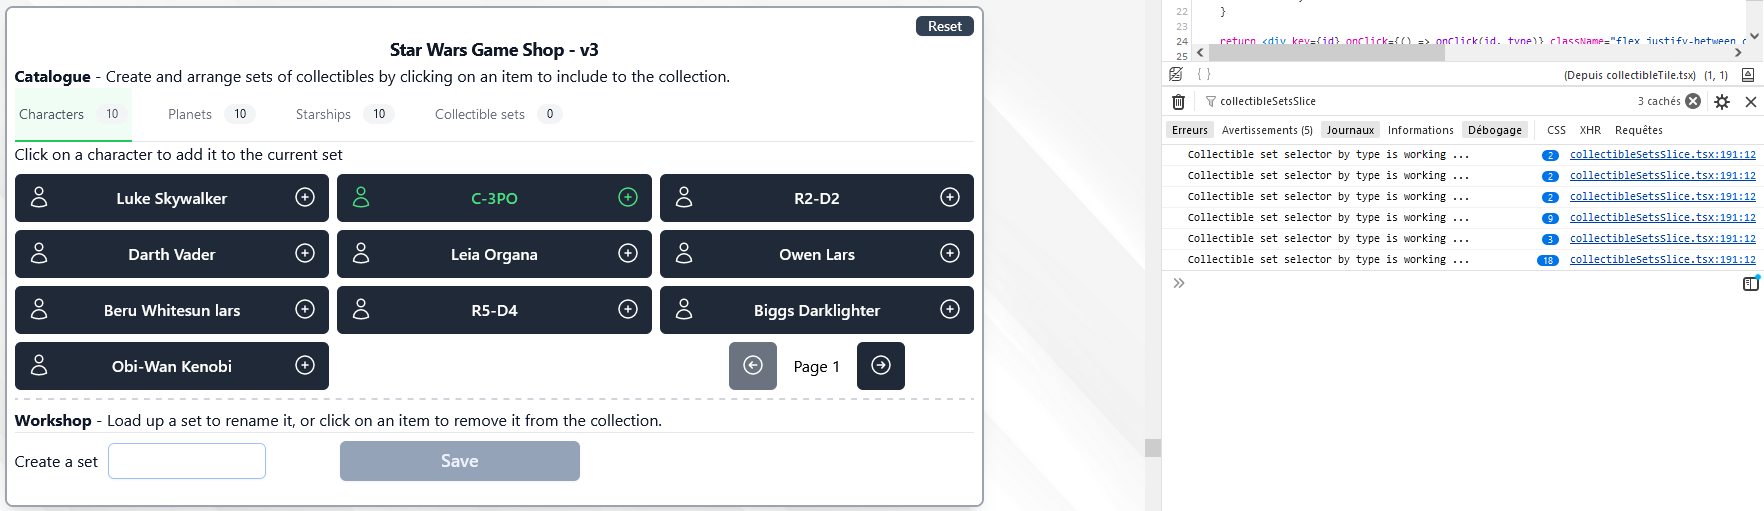
export const currentSetCollectibleByTypeSelector = createSelector(
[currentSetSelector,
(_, type: 'character' | 'planet' | 'starship') => type],
(currentSet, type) => {
console.log('Collectible set selector by type is working ...');
if (!currentSet) return [];
switch(type) {
case 'character': {
return currentSet.charactersList;
}
case 'planet': {
return currentSet.planetsList;
}
case 'starship': {
return currentSet.starshipsList;
}
default:
return []
}
}
);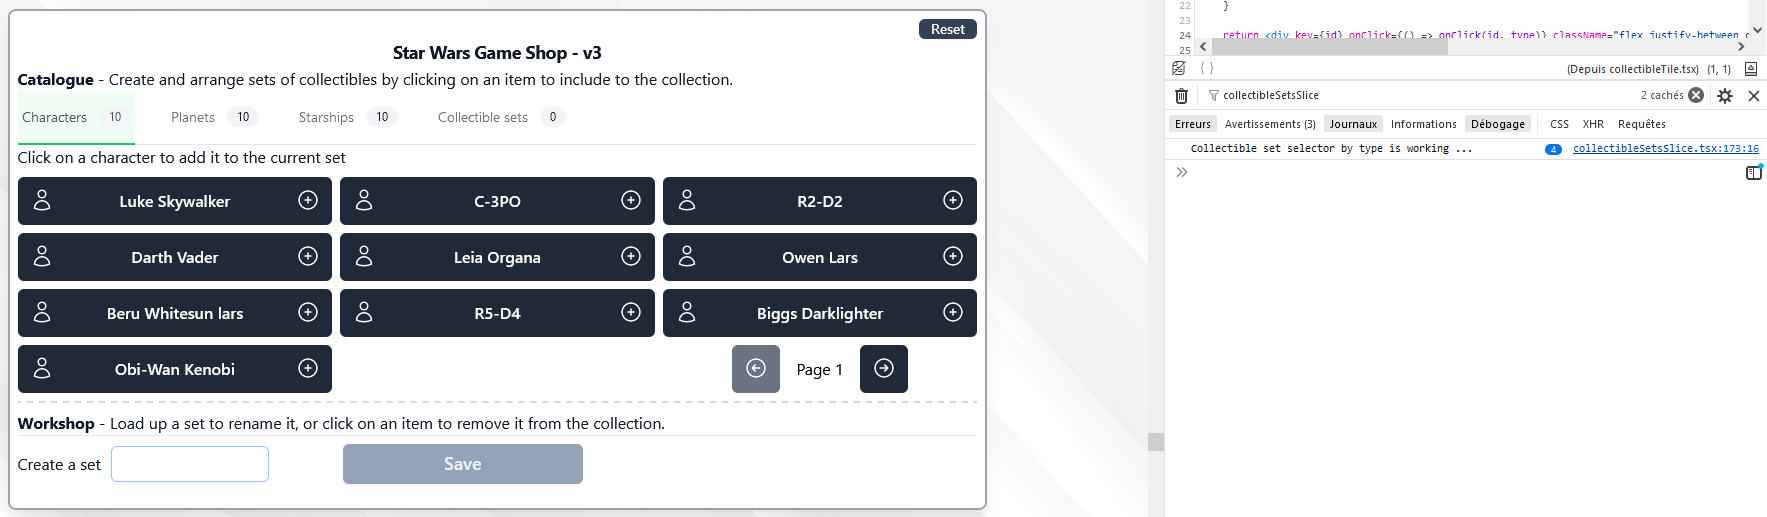 Selector fetching starship by page - memoized
- this time we have 2 input selectors, one returning the current set, and one the type of collectibles we wish to retrieve;
- if none of these two parameters change from one execution to the next, then the same result is directly returned. Otherwise we dig into the state again to fetch an updated value, which in turn will be memoized for the next call.
Our Redux journey is coming to an end, we've learnt a lot, from the fundamentals to some more advanced concepts, listed common pitfalls and how to avoid them. For digging even further into Redux, I recommend to check out the documentation or Redux toolkit query (RTK Query).
I do hope you've enjoyed reading through the article, and May The Force Be With You!
References